
|
Clean the Oculars of CF Miniature Binoculars . Reinigen Sie die Okulare der Mitteltreib Mini Fernglas. Nettoyer les Oculaires de CF Jumelles Miniatures. Очистите Oculars Центра основное внимание уделяется миниатюрные бинокль. Rengöring av Centre Focus Kikare Miniatyr. Limpiar los Prismáticos Oculares en Miniatura: Centro Tipo de Foco. Pulire Gli Oculari del Binocolo in Miniatura: Centro di Messa a Fuoco Centrale. |
|
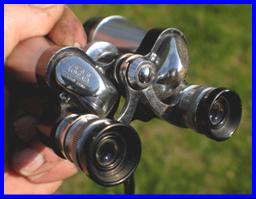
Cleaning the ocular lenses of those center focus binoculars that move the oculars in order to focus is a little different than cleaning the oculars of independent focus binoculars and center focus binoculars that move the objective lenses to focus. Also, the oculars are not sealed at all , so they tend to get quite dirty. |
|
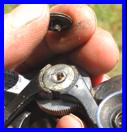
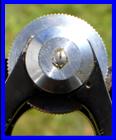
Remove the screw holding the center hinge pivot cover in place, and remove the cover. |
|
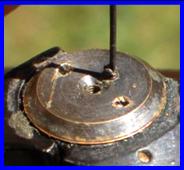
On most of these binoculars there is a screw on the retainer plate that that is locked in place by a small set screw. Remove the set screw. The screw is quite small, so take care not to drop or lose it |

|
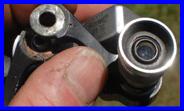
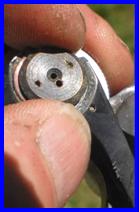
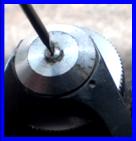
The plate is usually screwed tight. The proper removal method would involve a special wrench with pins that align with holes in the plate. A serviceable expedient is to catch the edge of the hole with a screwdriver blade and then tap the screwdriver to ”walk” or rotate the plate. It is best to use a cheap screwdriver. After it is loose, remove the plate with your fingers. |
|
Lift the arm and associated ocular off, making sure neither end binds up. It may be necessary to gently pry the center pivot end off. If you lift one side and the other binds, then it is not too hard to break the arms. Keep track of which arm goes over and which goes under. |
|
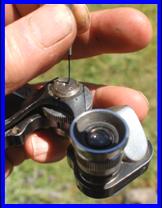
Clean the ocular lens with a cotton swab tip wetted with optical cleaner, followed by a dry cotton swab. Check for cleanliness. |
|
Replace the oculars and arms going to the center pivot. Then screw in the plate. Note that on one arm assembly (usually the left one) there may be a hole the arm that needs to be lined up with a pin.
|
|
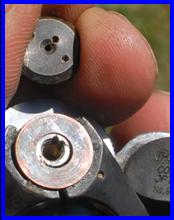
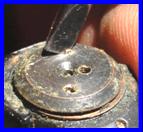
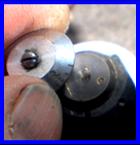
A |
|
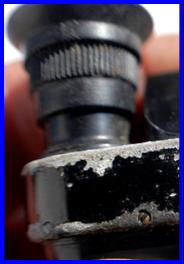
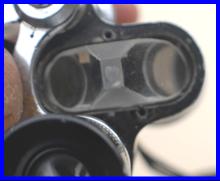
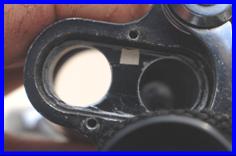
Replace the washer and screw on the plate. Note that the set screw hole in the plate ( A ) will have to line up with a relief hole under it. ( B ) Walk the plate into alignment by tapping the screw driver while watching for the set screw holes to align. Then affix the set screw. |


|
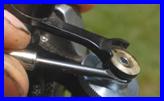
Re-attach the center pivot beauty cover, with it’s screw. |
|
Miniature Binoculars Parts Interchangeability (and lack thereof). Miniaturfernglas–Teil-Austauschbarkeit. Interchangeabilitié des Pieces de Rechange des Jumelles Miniature. Миниатюрные бинокль: детали обмена данными? Utbytbarhet av Dwelar Miniatyr Kikare. Intercambio de Partes Entre Prismáticos en Miniature? Il Binocolo in Miniatura Intercambiabilità Delle Parti. |
|
I often get asked “Where can I get replacements for the [frequently missing] plastic eyecups for my Nikon JB-7 marked (older issue) 7x15 binoculars?” The answer is nowhere as far as I know, and I know of no eyecups of other binoculars that fit that particular model. Eyecups are often missing from miniature binoculars. Sometimes eyeglass wearers discarded them to correct eye relief, and sometimes they broke or stripped out or were removed and lost. Replacement parts were not available when the binoculars were new, and are less available now. Purchasing another [preferably cheap and common] binocular with parts that will fit and can be scavenged is the normal recourse to sourcing missing parts. But in general, parts from one manufacturer (not brand) may not fit another manufacturer’s miniature binoculars, due to minor differences. For my own convenience in sourcing missing eyecups, I created an eyecup interchange list, by physically trying a pair of eyecups on other binoculars in my collection. Keep in mind that a single brand and power of binocular may have been made by multiple manufacturers (I have documented at least 4 variants for Selsi 7x18 CF binoculars for example). So pay a lot of attention to JB manufacturer code numbers of what you are buying to get parts from. Because of all the variables, it is best to view my interchange list as being a “probability” chart, and while it certainly increases the chances of getting something that will fit, it hardly guarantees it. It is specific to brand, power, focus type, and manufacturer “JB” mark. I will expand this when I have nothing else to do (infrequent occurrence) and am overloaded with surplus patience. |
|
“MSC / Meiji Seiko” Pattern Binoculars Eyecups MSC/ Meiji Seiko Muster der ugenmuscheln. MSC / Meiji Seiko Modèle des Boucliers d'oeil. Prismáticos Anteojeras: Meiji Seiko Patrón. |
|
“MSC” ( Meiji Seiko Co. Ltd.) pattern eyecup, all plastic. Most binoculars using this are not JB marked. Those with any manufacturer indication are MSC marked/ Meiji Seiko Co. Ltd |
|
EYECUP INTERCHANGE |
|
Adams 6x15 IF binoculars Arrow 6x15 CF JB5 marked binoculars Atlas 6x15 IF “ MSC ” marked binoculars Binolux 10x20 IF binoculars Broco 7x18 CF “ MSC ” marked binoculars Fortuna 6x15 CF JE50 marked frame Lupinus 10x20 IF binoculars Mayar 8x20 CF binoculars Minuette 7x18 IF binoculars Perl 8x20 CF “ MSC ” & JE50 marked binoculars Plum 6x15 IF binoculars Rainbow 8x20 CF binoculars Rainbow 8x20 CF “ MSC ” marked binoculars Silver 6x15 CF “ MSC ” marked binoculars Skyline 6x15 IF binoculars Skyline 7x18 IF binoculars Skyline 8x20 IF binoculars Yoshida 6x15 MIOJ IF binoculars Yoshida 7x18 MIOJ IF binoculars
|
|
“Seiwa” Pattern Eyecups. Seiwa Muster der Augenmuscheln. Seiwa Modèle des Boucliers d'oeil. Prismáticos Anteojeras: Seiwa Patrón. |
|
“Seiwa Kogaku Co Ltd pattern” eyecup interchange. Most binoculars using this pattern eyecup are JB93 / Seiwa Kogaku Co Ltd marked. |
|
Aristotone 6x15 IF JB93 marked binoculars Aurora 7x18 CF JB93 marked binoculars Binolux 6x15 IF JB93 marked binoculars Binolux 8x20 CF JB93 marked binoculars Gold Cup 8x20 CF JB93 marked binoculars Harpers 7x18 IF binoculars Jason 6x15 CF JB93 marked binoculars Petlux Shannon 10x20 CF JB93 marked binoculars Raiya 10x20 CF JB93 marked binoculars Sears 7x15 CF JB93 marked binoculars Scope 7x20 CF JB93 marked binoculars St Moritz 6x15 IF binoculars Yoshida Thorobred 6x15 IF binoculars |

|
10.70mm |
|
Dimensions approximate |
|
20.16 mm |


|
22.16 mm |
|
12.85 mm |
|
Dimensions approximate |
|
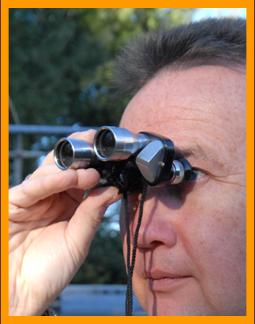
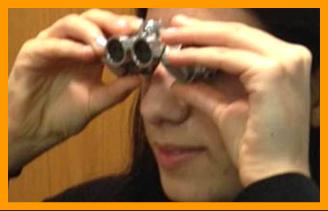
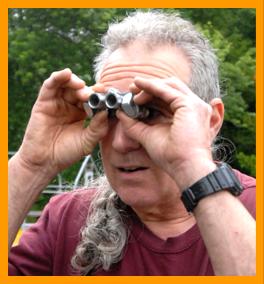
Unfortunately, lots of binoculars are found like this with a missing eyepiece. |
|
Uncooperative Eyecups. Repair Tip. Unkooperativer Augenmuscheln. Reparatur Tipp. Récalcitrants œilletons. Réparation Astuce. Миниатюрные бинокль ремонт предложение. Icke Samarbetsvilliga Öga Koppar På Kikare. Reparera Tips. 小型双眼鏡修理提案 . Anteojeras no Cooperativa. Reparación Punta. Tazze D’0cchio no Cooperativi. Punta di riparazione. |
|
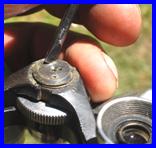
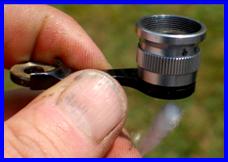
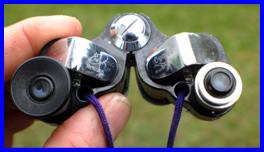
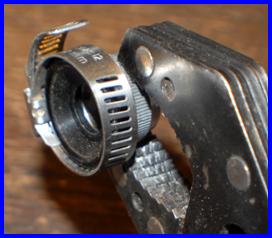
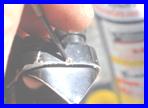
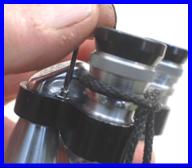
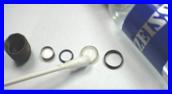
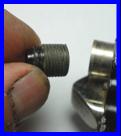
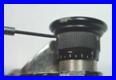
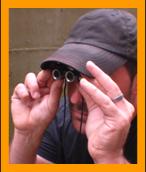
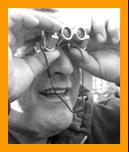
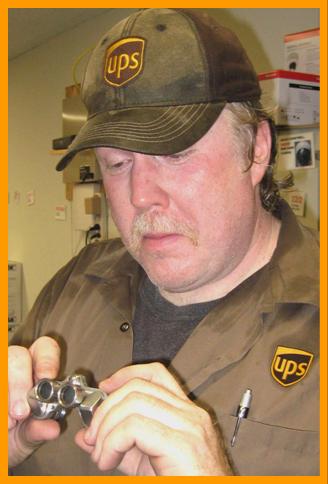
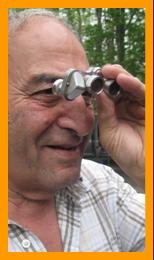
In order to get at the screws for the binocular ocular ring, to work on a seized ocular the assembly, the eyecups must be taken off. Usually they simply unscrew with your fingers with a concerted effort. Sometimes they don’t. Once in a while it is because a previous owner stripped them out and glued them on. But more often they are simply jammed in place or cross threaded. This seems to happen most often with the earlier entirely Bakelite eyecups. Bakelite is a phenolic plastic (technical name is polyoxybenzylmethylenglycolanhydride ), and was one of the first plastics to be developed (around 1909). Because it is non conductive to electricity and is heat resistant, it is still used on things like automotive distributor caps and coils and cooking pot handles. Older steering wheels used to be made of it. But it is quite brittle. So you can’t grip these eyecups with pliers, as the eyecups will shatter. The method I use is get a narrow automotive hose clamp (narrow ones have a better curvature of the rigid part) and gingerly snug it on the eyecup until it doesn’t slide. I then use Robogrips® on the knurled ring (I like that tool for this purpose as they have good feedback and feel, so it is easier not to crush the fairly flimsy rings, and if you are careful you can be progressive with the force and get a good grip that will not slip and damage the parts). A second hose clam would also work well. I spent ten minutes trying to get the Bakelite eyepieces off this binocular with my hands without any success (and I have a reasonably strong grip). When it looked like I might have to deliberately crack them to get them off, I then used the setup shown, and they came off without damaging anything. |

|
Uncooperative Screws. Repair Tip #2. Unkooperativer Schrauben. Reparatur Tipp #2. Non Coopératif Vis. Réparation Astuce #2. Миниатюрные бинокль ремонт предложение. 小型双眼鏡修理提案 . Icke Samarbetsvilliga Skruvar. Reparera Tips #2. Los Tornillos no Cooperativos. Reparación Punta #2. . Viti non Cooperanti. Punta di Riparazione #2. |
|
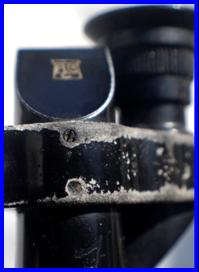
Heat will work on screws that are reluctant to turn due to corrosion, and it is a quick remedial method. However, sometimes these screws are close to painted surfaces, which applying heat would damage. An example would be the set screws for adjusting the prisms which are set into the painted binocular frame. If these screws are uncooperative, and if you use too much force, then the screw slots will simply strip out. Around the time you realize the screw doesn’t want to turn, but before you strip the slots off, it is advisable to place one drop of PB Blaster® penetrating lube on the screw and let it penetrate overnight. Or for 10 minutes if you are less patient. The idea is that the lube will penetrate into the threads, reducing friction enough for the screw to turn out. It usually works. |
|
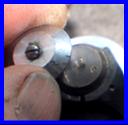
The prisms were out of collimation on these 90 plus year old German Optistar miniature binoculars. But the prism set screws did not want to turn due to the advanced corrosion between the alloy frame and brass screws. One drop of PB Blaster® and a bit of patience to let it penetrate overnight corrected the impediment, and then both set screws were able to be adjusted and the collimation issue was easily corrected. |
|
Uncooperative Screws. Repair Tip #1. Unkooperativer Schrauben. Reparatur Tipp #1. Non Coopératif Vis. Réparation Astuce #1. Миниатюрные бинокль ремонт предложение. 小型双眼鏡修理提案 . Icke Samarbetsvilliga Skruvar. Reparera Tips #1. Los Tornillos no Cooperativos. Reparación Punta #1. Viti non Cooperanti. Punta di Riparazione #1. |
|
Drip lube from a screwdriver tip onto the screw. Then let it soak in. |
|
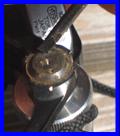
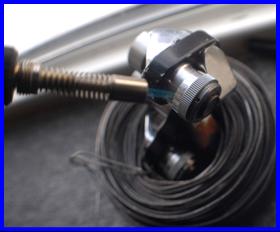
One way to deal with screws that are reluctant to turn due to corrosion, is to heat them with a pencil torch. For example, if uncooperative, the three screws on the binocular diopter ring would be appropriate candidates for this. The idea is heat the screw so that it expands differently than its surroundings, as well as breaking down any materials in the threads, reducing friction enough for the screw to turn out. Though a bit counterintuitive, the heat expansion differential is usually enough to free up the screw. On a larger and more demanding application a similar method is used on some tight fitting bearings, where the bearing assy is frozen and the housing is put in an oven (shrinking the frozen one and expanding the heated one) to get an interference fit at normal temperatures. |
|
Heating a diopter ring screw to release it. Note use of a heat resistant backstop for the binocular: in this case a roll of fencing wire that actually holds the binocular well. |
|
Japanese External Reverse Porro Prism Binoculars. On Line MUSEUM |
|
Collimation of Miniature Binoculars (Binoculars Without Adjustment Screws) Kollimation der Prismen der Miniaturferngläser. ( Fernglas ohne Stellschtrauben).Collimation des Prismes des Jumelles Miniatures. (Jumelles Sans Vis de Rélage). 小型双眼鏡 のプリズム調整 Коллимация миниатюрных Бинокль. Kollimering av Miniatyr Kikare (Kikare utan Justeringsskruvar). Colimación de Óptica Prismáticos en Miniatura. (Prismáticos sin Tornillos de Ajuste). Collimazione di Binocoli in Miniature (Binocolo Senza Viti di Regolazione) |
|
Almost all miniature binoculars of this type use adjuster screws to move and align the prisms. But a few don’t have screws and use shims. These include most of the vintage Omega binoculars, and most of the new Chinese made binoculars of this design. This was apparently expedient manufacturing done to save the cost of drilling and tapping 8 holes in the frame. Collimation by shim follows. |
|
Most Omega brand binoculars lack prism adjuster screws. This unusually powerful pair of 15x24 binoculars is no exception, and as usual they arrived very badly collimated with a double image. Because of no adjustment screws, and collimation often bad, I like Omega binoculars least of all the vintage binoculars of this type. However, it is possible to adjust the prisms using shims, as I will demonstrate. |
|
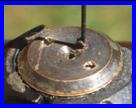
To adjust the prisms of binoculars without adjuster screws, first remove the screws holding the prism cover of the prism you wish to effect. |

|
This picture shows a factory installed shim in place. Shims are located to tilt the prism along it’s horizontal axis. |
|
By adding and deleting shims, if you are lucky, the prisms can be aligned or collimated enough to give a single image. A certain amount of trial and error is involved and the process is far harder and less precise than with binoculars with prism adjusting screws. Keep in mind that this form of collimation is one of conditional alignment or image merging rather than the collimation method by optical instrument that may provide 3 axis collimation. |

|
The shims are card paper. Cutting a manila file folder from an office supply store gives a shim thickness that is similar and functional. |
|
I was able to achieve a decent collimation of these 15x24 binoculars that arrived with a horrible double image in around 15 minutes. I considered that result to be a pleasant surprise. |


|
Miniature Binoculars: Ocular Repair. Miniatur-Ferngläser : Okular Reparatur. Jumelles Miniatures : Réparation de Lentille Oculaire . Миниатюрные бинокли : Глазные Ремонт объектива. Miniatyr kikare : okularlinsen Repair . Prismáticos Miniatura : Reparación de la Lente Ocular. Binocolo in Miniatura: Riparazioni Oculari. |
|
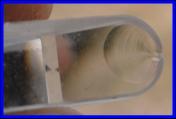
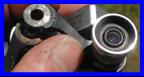
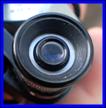
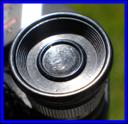
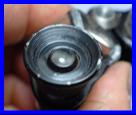
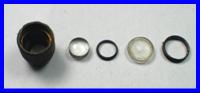
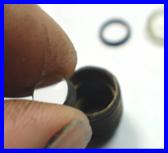
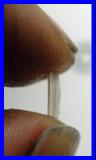
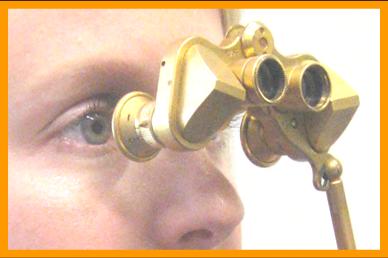
This is how the ocular (lens pack closest to the eye) normally looks. You can clearly see the first lens. |
|
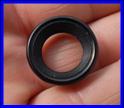
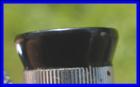
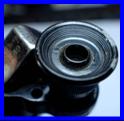
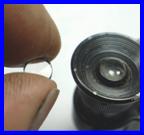
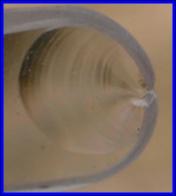
This is how the oculars looked on a pair of miniature binoculars I recently acquired. There is obviously a problem. What has occurred is the retaining ring that holds the first lens in place has unscrewed itself and let the lens fall into the assembly. The process to repair this condition is as follows... |
|
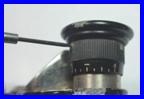
Loosen the three screws holding the ocular ring in place (in this instance the ocular ring and eyepiece are one integrated part...otherwise first remove the eye shield to get access to the screws under it) |

|
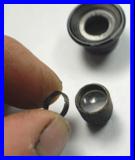
Remove the ocular ring. |
|
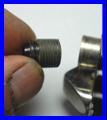
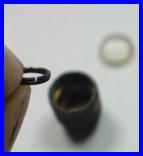
Unscrew and remove the ocular assembly. |
|
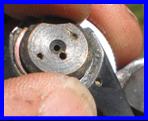
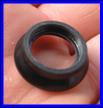
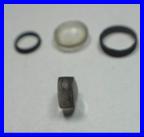
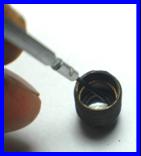
Unscrew and remove retaining ring or collar inside the ocular tube by rotating it by it’s slot (walk it around) and remove the lens. Do the same for the smaller interior collar and lay the parts out and clean them. |

|
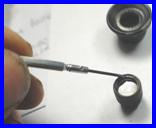
plano convex lens |
|
In this instance both lenses in the ocular lens pack are plano convex lenses (flat one side and domed the other), and they must be correctly positioned. You can check against the other ocular assembly if in doubt. In this case the flat surface of the smaller lens is closest to the eye. |
|
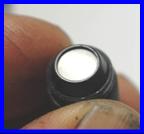
Drop the smaller lens flat side down into the ocular barrel and make sure it goes all the way in. Then drop the retaining collar in place with slotted surface toward you and screw it into place by rotating it with a screwdriver. |
|
New shim |
|
The larger lens is also a plano convex lens. In this case the dome side goes down and the flat side closest to you. Screw the retaining ring in place. |
|
Orientation of lenses |
|
Screw the ocular assembly into the ocular barrel. Replace the ocular ring/ and eyepiece and fasten in place. The last photo shows the repaired binoculars. |


|
Chipped or spalled prisms are a potential problem area with binoculars, usually as a result of being dropped. The point where they usually chip is where the prism contacts the prism adjusting screws. In addition to impact damage, when moving prisms around with their positioning screws to achieve collimation, there is also some potential of chipping the prisms. This usually happens when someone tightens a screw without loosening the opposing one, or when one continues to tighten a screw after the prism has run out of movement room, or when one confuses the screws with car wheel lug nuts and tries to apply 100 ft-lb torque, or by trying to move a prism which is stuck in place. It should not happen if you are reasonably careful and gentle, but be aware that there is always a lurking possibility of chipping prisms during repairs. |
|
Damaged Prisms. Beschädigte Prismen. Prismes Endommagés. Skadade Prismor. Prismas Dañados. Prismi Danneggiati. |
|
MINIATUUR JAPANSE VERREKIJKERS MINIATUROWE LORNETKI PIENOISKOOSKA JAPANILAINEN KIIKARIT μικροσκοπικά κιάλια ミニチュア双眼鏡 ống nhòm mini مناظير مصغرة اليابانيةچھوٹے جاپانی دوربین BINÓCULOS JAPONÊS EM MINIATURA DÛRBÎN JAPANESE XWEBIXWE دوربین دوچشمی ژاپنی مینیاتوری MINIATUUR JAPANESE BINOCULAERS MINIJATURNI JAPANSKI DALEKOZOR MINIATURNÍ JAPONSKÉ DALEKOHLEDY MALIIT NA LARAWAN JAPANESE LARGABISTA MINIATYURA YAPONIYA DURBIN BINOCOLO GIAPPONESE IN MINIATURA TEROPONG KECIL JEPUN TYHULASI AMANCINANE JAPANESE ỐNG NH Ò M MINIATURE NH Â T BảN సూక్ష్మ జపనీస్ దూరదర్శిని மினியேச்சர் ஜப்பனீஸ் தொலைநோக்கியின் KEKERAN JEPANG MINIATUR کوچني د جاپان د فير CASRIGA GHADAFI JAPANESE MINIJATURNI JAPANSKI DALEKOZORI MINYATI LONGVI JAPON È L Í TIL JAPANSKA SJ Ó NAUKI MINIAT Ü R T Á VCS Ö DADA JAPAN BINOPKULARI MINIATURE JAPANESE MAKA ANYA ABUO KAKANG'ONO ZOYANG'ANIRA JAPANESE |


|
CONTACT US WITH INFORMATION OR COMMENTS: miniature.binoculars@gmail.com |


|
Fernglas-Reparatur, Réparation de Jumelles, Ремонт бинокля, 双眼鏡修理 |
|
Kikare Reparation, Reparación de Prismaticos, Riparazione del binocolo |
|
Miniature Binoculars, Jumelles Miniatures, Miniatur-Ferngläser, |

![Text Box: CLICK ON PAGE LINE. CLIQUEZ SUR LA LIGNE DE PAGE. KLICKEN SIE AUF SEITENZEILE. HAGA CLIC EN LÍNEA DE PÁGINA..[ページ行]をクリックします。НАЖМИТЕ НА СТРОКУ СТРАНИЦЫ. ALSO SEE INDEX.](image676.gif)


|
FOR OUR MILITARY & FULL SIZE BINOCULARS see sections OTHER BINOCULARS & BIG & SMALL |
|
FOR OUR MILITARY BINOCULARS see sections OTHER BINOCULARS |